
AWSでRedmine 4.1.1を起動し、メール通知、HTTPS対応、Git連携、定期バックアップ等を行う手順です。
AWSでRedmineを起動
BitnamiのAMIを使用して起動しました。Redmineがインストールされた状態で起動します。
起動時のインスタンスタイプは t3a.small を選択しましたがセットアップ後は t3.nano で稼働しています。
AWS Marketplace: Redmine Certified by Bitnami

Redmineへログインする
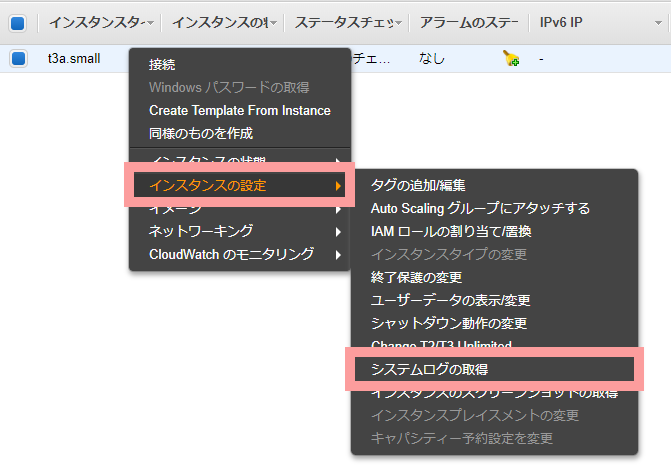
EC2インスタンスが起動したらログイン情報を確認してRedmineにログインします。
ログイン情報の確認
- AWS マネジメントコンソール にログインします。
- 「コンピューティング」から「EC2」を選択します。
- インスタンス内の「インスタンス」メニューを選択します。
- 一覧からRedmineのインスタンスを選択します。
(インスタンスがなければ別のリージョンで起動しているかもしれません) - アクションメニューから「インスタンスの設定」「システムログの取得」を選択します。
参考: Find application credentials
システムログが表示されるのでスクロールして下記の部分を探してください。
パスワードは「XXXXXXXXXXXX」の部分で確認できます。
#########################################################################
#                                                                       #
#        Setting Bitnami application password to 'XXXXXXXXXXXX'         #
#        (the default application username is 'user')                   #
#                                                                       #
#########################################################################
パスワードが確認できたらブラウザでEC2インスタンスのパブリックIPにアクセス(http://{パブリックIP})してログインIDに「user」、パスワードに先ほど確認した「XXXXXXXXXXXX」の部分を入力してログインします。
ログインしたらすぐにパスワードを変更します。
(右上のMy Account→Change password)
日本語化
- 管理ページ(デフォルトの言語)
Administration → Settings → Display → Default language → Japanese (日本語)
- 個人設定
My account → Language → Japanese (日本語)
メール通知の設定(Amazon SES)
メール通知に使用するSMTPサーバーをAmazon SESに設定しました。
$ cd /opt/bitnami/apps/redmine/htdocs/config$ cp configuration.yml configuration.yml.org$ vim configuration.yml email_delivery:
delivery_method: :smtp
smtp_settings:
enable_starttls_auto: true
address: email-smtp.us-west-2.amazonaws.com # Amazon SES の SMTPサーバー
port: 587
domain: example.com # 送信元メールアドレスのドメイン
authentication: :login
user_name: "XXXXXXXXXXXXXXXXXXXX" # Amazon SES の IAMユーザー
password: "XXXXXXXXXXXXXXXXXXXXXXXXXXXXXXXXXXXXXXXXXXXX"保存したら設定が有効になるようにApacheを再起動します。
$ sudo /opt/bitnami/ctlscript.sh restart apacheRedmineの管理 → 設定 → メール通知 → 送信元メールアドレス でメールアドレスを変更して保存します。
メール通知ページの右下にある「テストメールを送信」をクリックしてメールが送信できることを確認します。
GmailのSMTPサーバーを使用したい場合は下記のリンク先に例があります。
参考情報
- Configure SMTP for outbound emails
- Use Amazon Simple Email Service (SES)
- Amazon SES SMTP エンドポイントに接続する
- Redmine and Amazon SES
タイムゾーンの設定
デフォルトのタイムゾーンを「’Tokyo’」に設定すると下記のwarningが出るので「:local」に戻しました。
warning: :database_timezone option must be :utc or :local - defaulting to :local
デフォルトのタイムゾーンを「Tokyo」に設定します。
参考: Configure the default timezone
$ cd /opt/bitnami/apps/redmine/htdocs
$ bundle exec rake time:zones:all
* UTC +09:00 *
Osaka
Sapporo
Seoul
Tokyo
Yakutsk
$ cd /opt/bitnami/apps/redmine/htdocs/config
$ cp application.rb application.rb.org
$ vim application.rb
config.active_record.default_timezone = 'Tokyo'$ sudo /opt/bitnami/ctlscript.sh restart apacheチケットの有効期限の通知設定
チケットの有効期限がメールで通知されるようにcronを設定します。
ドキュメント通りのコマンドを実行するとエラーになりました。
$ sudo /opt/bitnami/ruby/bin/rake -f /opt/bitnami/apps/redmine/htdocs/Rakefile redmine:send
_reminders days=7 RAILS_ENV="production"
rake aborted!
Gem::LoadError: You have already activated rake 12.3.3, but your Gemfile requires rake 13.0.1. Prepending `bundle exec` to your command may solve this.
/opt/bitnami/apps/redmine/htdocs/config/boot.rb:6:in `<top (required)>'
/opt/bitnami/apps/redmine/htdocs/config/application.rb:3:in `<top (required)>'
/opt/bitnami/apps/redmine/htdocs/Rakefile:5:in `<top (required)>'
(See full trace by running task with --trace)
「bundle exec」を付けると良さそうなので試してみると成功しました。
$ cd /opt/bitnami/apps/redmine/htdocs
$ sudo bundle exec rake -f Rakefile redmine:send_reminders days=7 RAILS_ENV="production"
これをcronに設定して毎日通知します。
$ sudo crontab -e
0 0 * * * cd /opt/bitnami/apps/redmine/htdocs; sudo bundle exec rake -f Rakefile redmine:send_reminders days=7 RAILS_ENV="production"
$ sudo /etc/init.d/cron restartHTTPS対応(Let’s Encrypt)
BitnamiのHTTPS構成ツールを使ってHTTPS対応します。
参考: Auto-configure a Let’s Encrypt certificate
初回実行時にツールが古くて終了してしまった場合は再度実行します。
$ sudo /opt/bitnami/bncert-tool
An updated version is available. Would you like to download it? You would need to run it manually later. [Y/n]:

The tool will exit now. To run the updated version run the following command:

/opt/bitnami/bncert-tool
ドメインの指定
$ sudo /opt/bitnami/bncert-tool
----------------------------------------------------------------------------
Welcome to the Bitnami HTTPS Configuration tool.

----------------------------------------------------------------------------
Domains

Please provide a valid space-separated list of domains for which you wish to
configure your web server.

Domain list []: redmine.example.com

The following domains were not included: www.redmine.example.com. Do you want to add them? [Y/n]: n

Warning: No www domains (e.g. www.example.com) or non-www domains (e.g.
www.example.com) have been provided, so the following redirections will be
disabled: non-www to www, www to non-www.
Press [Enter] to continue:
HTTPからHTTPSへのリダイレクトを有効にする
----------------------------------------------------------------------------
Enable/disable redirections

Please select the redirections you wish to enable or disable on your Bitnami
installation.


Enable HTTP to HTTPS redirection [Y/n]: y
BitnamiHTTPS構成ツールの実行内容を確認
----------------------------------------------------------------------------
Changes to perform

The following changes will be performed to your Bitnami installation:

1. Stop web server
2. Configure web server to use a free Let's Encrypt certificate for the domains:
redmine.example.com
3. Configure a cron job to automatically renew the certificate each month
4. Configure web server name to: redmine.example.com
5. Enable HTTP to HTTPS redirection (example: redirect http://redmine.example.com
to https://redmine.example.com)
6. Start web server once all changes have been performed


Do you agree to these changes? [Y/n]: y
Let’s EncryptのHTTPS証明書の作成に同意する
----------------------------------------------------------------------------
Create a free HTTPS certificate with Let's Encrypt

Please provide a valid e-mail address for which to associate your Let's Encrypt
certificate.

Domain list: redmine.example.com

Server name: redmine.example.com

E-mail address []: redmine@example.com

The Let's Encrypt Subscriber Agreement can be found at:

https://letsencrypt.org/documents/LE-SA-v1.2-November-15-2017.pdf

Do you agree to the Let's Encrypt Subscriber Agreement? [Y/n]: y
----------------------------------------------------------------------------
Performing changes to your installation
The Bitnami HTTPS Configuration Tool will perform any necessary actions to your
Bitnami installation. This may take some time, please be patient.
----------------------------------------------------------------------------
Success
The Bitnami HTTPS Configuration Tool succeeded in modifying your installation.
The configuration report is shown below.
Backup files:
* /opt/bitnami/apache2/conf/httpd.conf.back.202006160149
* /opt/bitnami/apache2/conf/bitnami/bitnami-apps-prefix.conf.back.202006160149
* /opt/bitnami/apache2/conf/bitnami/bitnami.conf.back.202006160149
Find more details in the log file:
/tmp/bncert-202006160149.log
If you find any issues, please check Bitnami Support forums at:
https://community.bitnami.com接続元のIPアドレスの制限
Redmineへのアクセスは指定したIPアドレスからのみに制限します。(例では198.51.100.0)
Apacheのバージョンは2.4なので、「IfVersion >= 2.3」の記述が反映します。
$ cd /opt/bitnami/apps/redmine/conf
$ cp httpd-app.conf httpd-app.conf.org
$ vim httpd-app.conf
RewriteEngine On
RewriteRule /<none> / [L,R]
<Directory "/opt/bitnami/apps/redmine/htdocs/public">
Options -MultiViews
AllowOverride All
<IfVersion < 2.3 >
Order deny,allow
Deny from all
Allown from 198.51.100.0
</IfVersion>
<IfVersion >= 2.3>
Require all denied
Require ip 198.51.100.0
</IfVersion>
PassengerEnabled on
#SetEnv RAILS_RELATIVE_URL_ROOT "/redmine"
PassengerAppRoot "/opt/bitnami/apps/redmine/htdocs/"
<IfModule pagespeed_module>
ModPagespeedDisallow "*"
</IfModule>
Include "/opt/bitnami/apps/redmine/conf/banner.conf"
</Directory>テーマのインストール
テーマをインストールしたら管理ページで切替できます。
管理 → 設定 → 表示 → テーマ
farend bleuclair
$ cd /opt/bitnami/apps/redmine/htdocs/public/themes
$ git clone -b redmine4.1  https://github.com/farend/redmine_theme_farend_bleuclair.git bleuclair
gitmike
$ cd /opt/bitnami/apps/redmine/htdocs/public/themes
$ git clone https://github.com/makotokw/redmine-theme-gitmike.git gitmike
プラグインのインストール
Google Analytics plugin
$ cd /opt/bitnami/apps/redmine/htdocs/plugins
$ git clone git://github.com/paginagmbh/redmine-google-analytics-plugin.git google_analytics_plugin
$ sudo /opt/bitnami/ctlscript.sh restart apache
Gitリポジトリの設定(AWS CodeCommit)
AWS CodeCommitのGitリポジトリと連携して、Redmineからコミット内容を確認できるようにします。
Gitリポジトリのミラーを取得
「–mirror」オプションをつけてリポジトリをcloneします。
定期的にfetchしたいので「git config –global credential.helper store」コマンドで認証情報を保存しています。
$ cd ~
$ mkdir repositories
$ cd repositories
$ sudo git config --global credential.helper store
$ sudo git clone --mirror https://git-codecommit.ap-northeast-1.amazonaws.com/v1/repos/test/
Cloning into bare repository 'test.git'...
Username for 'https://git-codecommit.ap-northeast-1.amazonaws.com': XXXXXXXXXXXXXXXXXXXXXXXX
Password for 'https://XXXXXXXXXXXXXXXXXXXXXXXX@git-codecommit.ap-northeast-1.amazonaws.com':
remote: Counting objects: 3, done.
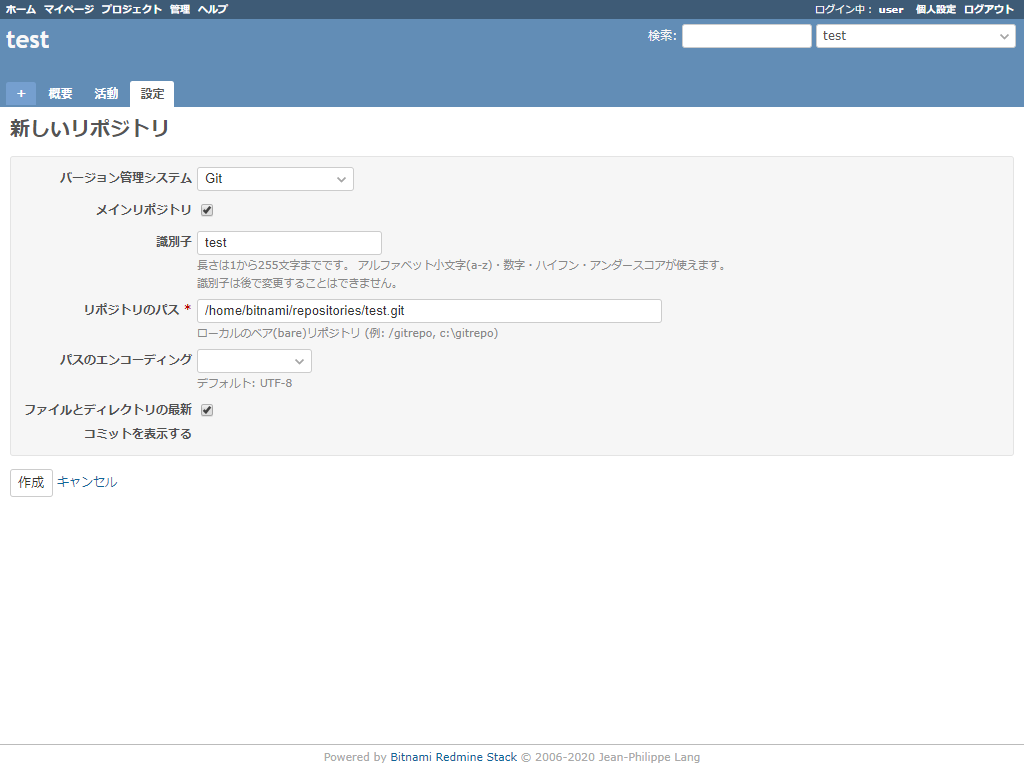
Unpacking objects: 100% (3/3), 212 bytes | 212.00 KiB/s, done.Redmineに設定するリポジトリのパスを確認します。
$ cd test.git
$ pwd
/home/bitnami/repositories/test.git
cronで定期的に「git fetch」コマンドを実行してRedmineへ反映します。
$ sudo crontab -e
0 0 * * * cd /home/bitnami/repositories/test.git; sudo git fetch --all
5 0 * * * cd /opt/bitnami/apps/redmine/htdocs; sudo bundle exec rake redmine:fetch_changesets RAILS_ENV="production"
$ sudo /etc/init.d/cron restartプロジェクトとリポジトリの連携
Redmineのプロジェクトの設定から新しいリポジトリを作成して連携します。
「リポジトリのパス」にはpwdコマンドで確認したパスを設定します。
バックアップ
RedmineのインストールディレクトリをまるごとバックアップしてAmazon S3へ転送します。
AWS CLIのインストール
$ sudo apt-get install -y awscli$ sudo aws configure
AWS Access Key ID [None]: XXXXXXXXXXXXXXXXXXXX
AWS Secret Access Key [None]: XXXXXXXXXXXXXXXXXXXXXXXXXXXXXXXXXXXXXXXX
Default region name [None]:
Default output format [None]: バックアップスクリプトの作成
ドキュメントを参考にインストールディレクトリをまるごとバックアップするスクリプトを作成します。
参考: Create and restore application backups
$ cd ~
$ mkdir backup
$ cd backup
$ vim backup.sh
#!/bin/sh
BKFILE=redmine-backup-`date +%Y%m%d`.tar.gz
BUCKET=s3://redmine-fire-sign/backup
cd /home/bitnami/backup
rm redmine-backup-*.tar.gz
/opt/bitnami/ctlscript.sh stop
tar -pczvf $BKFILE /opt/bitnami
/opt/bitnami/ctlscript.sh start
aws s3 sync `dirname ${BKFILE}` $BUCKET実行権限をつけて実行します。
$ chmod +x backup.sh$ sudo sh backup.shバックアップがAmazon S3に転送されたことが確認出来たら定期的に実行されるようにcronを設定します。
$ sudo crontab -e
0 20 * * * /home/bitnami/backup/backup.sh
$ sudo /etc/init.d/cron restartMySQLデータベースのみバックアップしたい場合はこちらが参考になります。
参考: Create and restore MySQL/MariaDB backups
リストア手順
Amazon S3からバックアップファイルをダウンロードします。(YYYYMMDDの日付は変更してください)
$ cd /home/bitnami/backup
$ sudo aws s3 cp s3://redmine-backup-bucket/backup/redmine-backup-YYYYMMDD.tar.gz ./
Redmineの各サービスを停止してバックアップファイルと置き換えます。
$ sudo /opt/bitnami/ctlscript.sh stop
$ sudo mv /opt/bitnami /tmp/bitnami-backup
$ sudo tar -pxzvf redmine-backup-YYYYMMDD.tar.gz -C /
$ sudo /opt/bitnami/ctlscript.sh start
これでひととおり完了です。


コメント